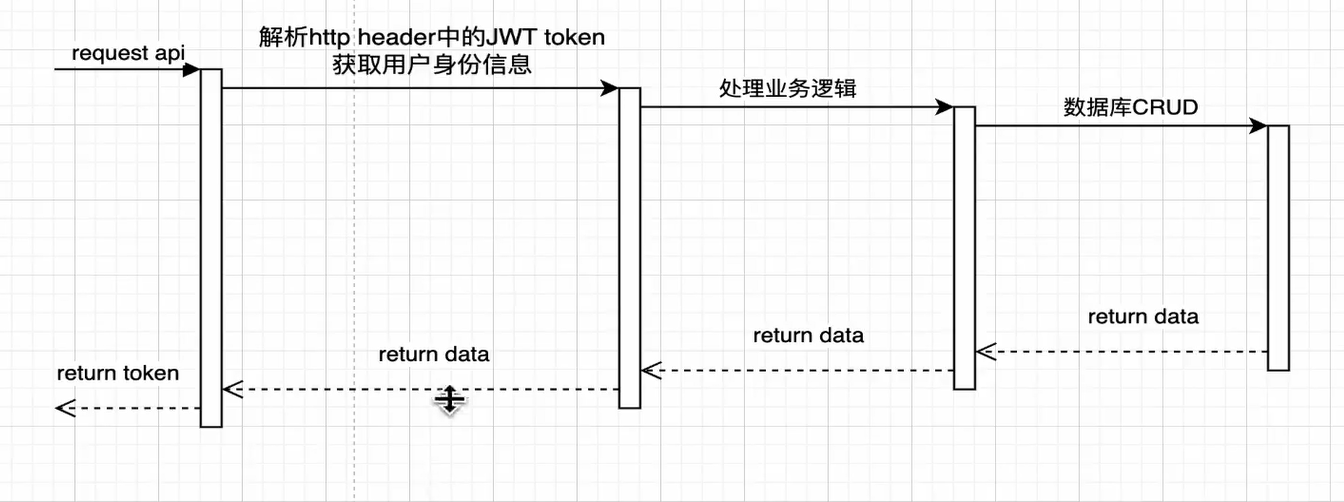
1.登录时序图

2.请求守卫开发
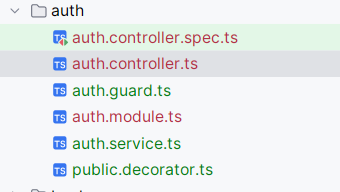
建立如下auth目录结构

1
2
3
4
5
|
import {SetMetadata} from '@nestjs/common';
export const IS_PUBLIC_KEY = 'isPublic'
export const Public = () => SetMetadata(IS_PUBLIC_KEY, true)
|
1
2
3
4
5
6
7
8
9
10
11
12
13
14
15
16
17
18
19
|
import {CanActivate, ExecutionContext, Injectable} from '@nestjs/common';
import {Observable} from 'rxjs';
import {Reflector} from '@nestjs/core';
import {IS_PUBLIC_KEY} from './public.decorator';
@Injectable()
export class AuthGuard implements CanActivate {
constructor(private reflector: Reflector) {
}
canActivate(context: ExecutionContext): boolean | Promise<boolean> | Observable<boolean> {
const isPublic = this.reflector.getAllAndOverride(IS_PUBLIC_KEY, [
context.getHandler(),
context.getClass()
])
return isPublic
}
}
|
1
2
3
4
5
6
7
8
9
10
11
12
13
14
15
16
17
18
|
import {Module} from '@nestjs/common';
import {AuthController} from './auth.controller';
import {AuthService} from './auth.service';
import {APP_GUARD} from '@nestjs/core';
import {AuthGuard} from './auth.guard';
@Module({
controllers: [AuthController],
providers: [AuthService, {
provide: APP_GUARD,
useClass: AuthGuard
}],
})
export class AuthModule {
}
|
5.2登录鉴权接口的调用链路
继续开发登录鉴权接口的调用链路
首先在auth.module中引入UserModule方便我们使用UserService中的查询用户操作,注意引入UserModule时需要先export UserService
1
2
3
4
5
6
7
8
9
10
11
| @Module({
imports: [UserModule],
controllers: [AuthController],
providers: [
AuthService,
{
provide: APP_GUARD,
useClass: AuthGuard,
},
],
})
|
随后在auth.controller中编写调用authService的逻辑
1
2
3
4
5
6
7
8
9
10
| @Public()
@Post('login')
async
login(@Body()
params
)
{
await this.authService.login(params.username, params.password);
return 'authed';
}
|
authService的逻辑便是调用userService查询是否有传入的username
1
2
3
4
5
6
7
8
9
10
11
| @Injectable()
export class AuthService {
constructor(private userService: UserService) {
}
async login(username, password) {
const user = await this.userService.findByUsername(username);
console.log(user);
}
}
|
至此登录鉴权的调用链路逻辑编写完毕
5.3 登录密码校验逻辑实实现
传进来的password需要进行md5加密转换,所以我们先安装md5库npm install md5,然后编写逻辑
1
2
3
4
5
6
7
8
9
10
| async
login(username, password)
{
const user = await this.userService.findByUsername(username);
const md5Password = md5(password).toString().toUpperCase()
console.log(user, md5Password);
if (user.password !== md5Password) {
throw new HttpException('message', HttpStatus.BAD_REQUEST)
}
}
|
接下来就要在密码验证成功时发送token
5.4 JWT跨域身份验证
安装nestjs提供的jwt模块npm install @nestjs/jwt,然后在auth.module中引入该模块
1
2
3
4
5
6
7
8
9
10
11
12
13
14
15
16
17
| @Module({
imports: [
TypeOrmModule.forRoot({
type: 'mysql',
host: 'localhost',
port: 3306,
username: 'root',
password: 'root',
database: 'vben-book-dev',
autoLoadEntities: true,
}),
UserModule,
AuthModule,
BookModule,
],
)
|
编写service登录逻辑
1
2
3
4
5
6
7
8
9
10
11
12
13
14
15
16
| async
login(username, password)
{
const user = await this.userService.findByUsername(username);
if (user === null) {
throw new HttpException('No User', HttpStatus.BAD_REQUEST);
}
const md5Password = md5(password).toString().toUpperCase();
if (user.password !== md5Password) {
throw new HttpException('PasswordError', HttpStatus.BAD_REQUEST);
}
const payload = {username: user.username, userid: user.id};
return {
token: await this.jwtService.signAsync(payload),
};
}
|
为了统一响应结果,可以在utils下编写success和error函数规范响应体
1
2
3
4
5
6
7
8
9
10
11
12
13
14
| export function success(data, msg) {
return {
code: 0,
data,
msg,
};
}
export function error(msg) {
return {
code: -1,
msg
}
}
|
并在controller中应用
1
2
3
4
5
6
7
8
9
10
11
12
13
14
15
16
17
| @Public()
@Post('login')
async
login(@Body()
params
)
{
let err;
const data = await this.authService
.login(params.username, params.password)
.catch((e) => (err = e));
if (!err) {
return success(data, '登录成功');
} else {
return error(err.toString());
}
}
|
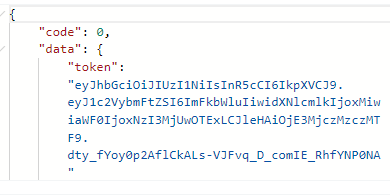
成功响应结果:

5.5前后端login接口联调
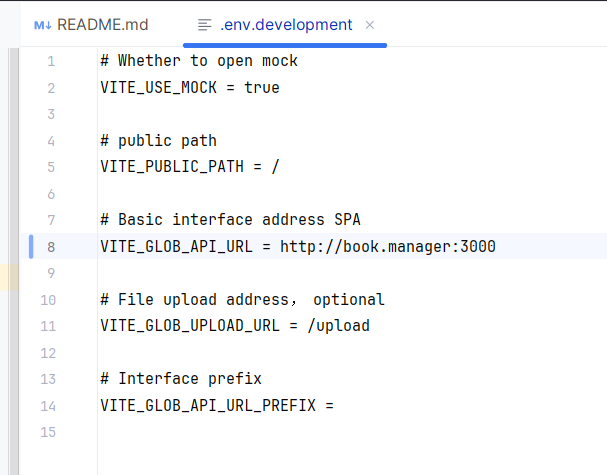
改动全局API_URL配置为域名+端口号地址

注意如果开启代理软件会导致host失效
然后解决前端兼容性问题,通过调试可知API响应格式为result,message。所以更改后端的响应格式即可兼容
5.6后端请求首位token验证逻辑开发
在查询用户操作应该在user.service中提供,所以在service和controller中添加getUserByToken方法.
在发送user/info请求时,请求会先发送到auth守卫中,然后再发给usercontroller。所以我们再auth守卫中首先校验token是否有效
1
2
3
4
5
6
7
8
9
10
11
12
13
14
15
16
17
18
19
20
21
22
23
24
25
26
27
28
29
30
31
32
33
34
35
36
37
38
39
40
41
42
43
| @Injectable()
export class AuthGuard implements CanActivate {
constructor(private reflector: Reflector, private jwtService: JwtService) {
}
async canActivate(context: ExecutionContext): Promise<boolean> {
const token = extractTokenFromHeader(request)
if (!token) {
throw new UnauthorizedException()
}
try {
const payload = await this.jwtService.verifyAsync(token, {
secret: 'abcdefg'
})
request['user'] = payload
} catch (e) {
throw new UnauthorizedException()
}
}
}
function extractTokenFromHeader(request) {
const token = request.headers.authorization;
return token
}
|
使用extractTokenFromHeader提取出请求头中的authorization字段中的token后再调用jwtService.verify
解出jwt的payload。如果是有效的则payload会被添加到请求头中的’user’字段方便Api调用用户信息。若不成功则会抛出异常
最后再user.controller中获取请求体并调用service查询用户信息
1
2
3
4
5
6
7
8
9
| @Get('info')
getUserByToken(@Req()
request
)
{
const user = request.user
return wrapperResponse(this.userService.findByUsername(user.username), '获取用户信息成功')
}
|


